
Day-sie Green
Posted on April 9, 2015 3 Comments
 I shared this recently at my new Art Etc Quilt group. I’ve never posted my process on this but today seems like a good time to do that. This was a challenge from my New Hampshire CC group at our second reveal. The challenge was “green.” Each participant had to use at least 7 values of green and could add a small amount of additional color of their choice. Quilts were to be 15″ x 15,” and one quilt 15″ x 32.”
I first sketched the shape, and numbered my pattern for future reference I cut petals and fused them to fabric then set them aside. Later I’d use the drawing to align each piece. Then I set about using some techniques that were new to me. First the background. I know, kind of a mess, huh? Snippets of fabric, a concept first introduced by Cindy Walters in her book Snippet Sensations, were fused to very specific areas, as you see.
  This technique was inspired by my quilting artist/friend Andrea Brokenshire over at AMB Fiber Art and Design. I’ve long admired her use of scraps to create an impressionistic background in her masterful pieces. She’s incredible, if you haven’t seen her work be sure to check it out. Her art is gorgeous photorealism, all painted on silk, and masterfully quilted. She’s rocking the quilting world with her talent.
Second, I fused my petals in place and added some shading and detail with paint, here I’m free motion quilting the petals with various threads.
Thirdly, I created a sculptural center for my daisy.  The center was quilted as a separate piece. I’d always wanted to try to create the perfect floral center spiral. This “golden spiral” has always intrigued me. It’s a set pattern established with a Fibonacci sequence, and created by God – the master artist. Alas, I fell short in my attempt but still the process was fun! This quilted center was painted and while it was still damp I shaped it then attached that to the background I’d created.
Here beading was auditioned for the center but, didn’t make the cut! 😉 I finished the piece with a very scrappy binding similar to a technique I’ve blogged about here sometime back.
I always enjoy these challenges. I take them on as an attempt to learn new techniques, expand my creative experience, as I enjoy sharing and growing with other like minded individuals. Grateful the CC group still let’s me participate and Skype in! This was our group’s collective effort. Notice how nicely they all display together. (Psst! That was planned! Great job Marie Joerger ;D) Maybe you have a similar group or challenge you’ve faced and would like to share? I welcome dialogue on this blog! Please, join in the fun!! 🙂
“Letters” Challenge Reveal
Posted on April 3, 2015 Leave a Comment
Whenever I’m in a challenge, I spend a lot of time thinking about how to participate, have fun, and learn something new in the process. And trust me, there’s always something new to learn!
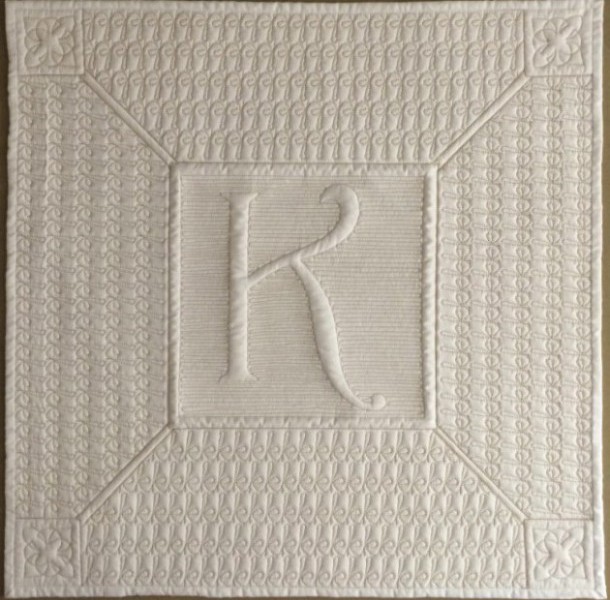
While Skyping with the Creative Conglomeration in New Hampshire, our latest challenge, “letters,” was given by Ellen Fisher. She gave no size limitations or restrictions, only freedom to create and share whatever inspired us. After much thought, I realized I’d never done a monogram piece! Fresh off of celebrating our 30th wedding anniversary, fueled by the desire to use and learn more of my new Statler Stitcher’s capabilities, I created this wall quilt entitled “Oh… K!”
Here’s a very quick video of some of the process. I LOVE my Statler Stitcher by Gammill!
I’m always inspired by Judi Madsen over at “Green Fairy Quilts.” She’s an AMAZING longarm quilter who always has a fresh approach in her composition. One thing that caught my eye, among the many, was her use of two layers of batting. One layer of a 80/20 blend and one of wool. This gives her quilting incredible definition and I love it. So, I tried it with this piece hoping it would give a nice trapunto affect, without the extra work that trapunto can be. The repetition of cursive letter k in the border had a serendipitous result in texture. I kinda like how my piece turned out, maybe you do to?
Have you ever participated in a challenge group, considered starting one, or tried a monogram wholecloth quilt? If so I’d love to hear about your creative process and welcome dialogue on my blog. Thanks for stopping by!
Our Challenge Group’s Monochromatic Reveal Is Up
Posted on March 29, 2015 Leave a Comment

Marie Joerger, my dear friend over a Marie’s Creative Space blog, and I started a challenge group a few years back. Even tho I’ve moved far away, we continue to stay in touch and I thought I’d share a post that she’s put up on our blog. The Creative Conglomeration has been a great source of inspiration and I highly recommend finding and joining in a creative group of kind souls like these ladies!
Creative Gypsy Longarm Quilting
Posted on March 21, 2015 6 Comments

For the last two months I’ve been prepping and in the process of launching a new business!
A little background, I’ve been in the industry for 30 years. I started out as an artist and seamstress, followed that up with teaching in my studio, at quilt shops and also loved teaching inmates in a correctional facility in Oregon! I’ve designed and sold patterns, served on guild boards, started and participated in quilting challenge groups, and my latest challenge is to now quilt for the public.
I don’t know about you but I struggle with how to eloquently put ALL of my thoughts in this blog. If you could see inside of my head you’d understand. Let me just say ideas are flying in all directions like lightning bugs along a river bank of the Mississippi at dusk. SO much has been going on. YES, I spent 4-5 months recovering from my hand surgery and I’m great!! Thank you Lord.
Second, for our 30th wedding anniversary my hubby, Darrell Kindley, who’s been after me to take my quilting to the next level encouraged me to get a Statler Stitcher longarm quilting machine by Gammill. (It’s really quite sweet, he’s been ordering Gammill catalogues for 10 years in hopes I’d catch the bug. Me? Hesitant to change? Poleese. I think with 29 moves not only have I earned the title “gypsy,” I believe my choices prove that wrong!) Investing in this shiny new boat anchor will not only enable growth in creativity, it will allow me to bust out of my self-induced creative chains, and meet other creative minded souls.

My sweet customer Linda’s quilt. I think she did a great job, it’s a gem of a quilt!
So thirdly, without further ado and yes after a few IG & FB pics, posts and hints, it is with great enthusiasm I give you….drum roll please…. Creative Gypsy Quilting. 😀
Be sure to look for my new website soon to follow. In the meantime, for pricing feel free to contact me, why yes! I’d be happy to quilt your completed quilt top! 😀
12 Tips for Living With Chronic Thumb Pain and Carpal Tunnel
Posted on November 16, 2014 2 Comments
I apologize if you’re family or a friend, you’ve heard this story. Heck, you’ve not only heard it you’ve lived it with me! I’m not normally a whiner but I AM pretty verbal about what I discover in my research and my attempt to live a healthy life. 🙂 If you’ve stumbled onto this post searching for information then welcome! I offer up my story and share with hope that someone who is struggling may find insights through my experience.
I know I’m not the only one who suffers with this. By nature, women face a triple threat of risk factors when it comes to arthritis: biology, genetic predisposition, and hormones. I know quite a few men suffer as well; take my father-in-law for example, he’s a retired rancher has similar painful thumb issues. My journey began over 12 years ago when tingling hands began waking me at night with strange sensations of nerves being pinched off and then what felt like blood rushing back into the bizarre numbness. At the same time, I began finding any hand work like gardening, weedeating, appliqué, knitting, or time spent rotary cutting my pieces for quilts was painful for my thumbs.
Tip #1. So I began using ergonomic tools like Martelli’s Ergonomic Rotary Cutter and Fiskar’s cushion handled spring loaded scissors and found they truly help with repetitive strain/discomfort.
 Tip #2. I found stretching helps. Yoga’s downward dog position is great to open up the tension and tightness in hands.
Tip #3 Rest from hobbies. Give your body a break, this definitely helps.
Tip#4 Try Grastoning. I found this through a chiropractor in Austin and it really seemed to help, as long as I continued to receive the technique.
Tip # 5 Climate matters! Moving from a fairly dry climate in Texas to a damp one in Portland, Oregon then onto a cold and wet one in Nashua, New Hampshire didn’t help the pain. Oh yeah, there’s a reason folks retire in Florida and not the cold northern climates.
Tip #6 Wear soft splints during the day and hard splints at night. Seek medical input. I sought help from an orthopedic doctor and he prescribed physical therapy which sadly, only caused more severe pain because it turned out I had mal-alignment in my thumb joints. Apparently, the x-rays he insisted on were fairly useless. ![]() Maybe you’ll have better luck than I did on this.
Maybe you’ll have better luck than I did on this.
Tip # 7 Chiropractic help! Shortly there after, I lucked out and found a great chiropractor who’d adjust my thumbs and the pain instantly went away! I think I scared her the first time she adjusted me because I burst into tears! The pain instantly stopped!! I could actually move my hands pain free! I was amazed and thrilled. As long as she adjusted me regularly, I was good. I did find that it was only for a brief periods of time and with any of my normal activity eventually my thumbs fell back out of alignment. Simple things like folding socks, holding a paint brush, pulling on my bra strap, or picking up a purse to toss on my shoulder caused severe sharp pain.
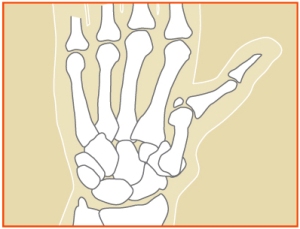
This EXPLAINED it! This was what kept happening to my thumb joints! No wonder it hurt so bad!
After years, I found the picture on the right and I was amazed! This explained it!! This was what kept happening to my poor lil thumbs, why they kept hurting so bad! I can only tell you now that indeed, it felt as if my thumb was out of joint and what’dya know? Turns out it was! Notice the image of the overlapping joints on the right. And, by now I’d began to develop a inflamed bump at the base of my thumbs. So, when this condition continues with enough time it develops into the following:

Imagine bone against bone! Chronic pain and inflammation insued.
Tip # 7 Gluten isn’t your friend. Now, I must say for sometime I also found relief with dietary changes. The same chiropractor told me that gluten in my diet could be an issue and was certainly not helping with inflammation. So, I gave it a try. I totally cut out gluten, which took quite a bit of studying and was a bit of a learning curve, but helped! And, when I’d test it and splurge on something, with gluten, the reaction was severe. It was as if an icepick had stabbed the joint!! No kidding. It made that kind of difference. That bought me a few more years.
 Tip # 8 Try homeopathic paths to pain relief. Throughout the years of my journey I also found relief when I tried a more homeopathic approach to the pain. I discovered that an imbalance in one’s body’s PH can cause inflammation as well and drank enough PH ION Green Superfood that it seemed to helped.
Tip #9 Give the crazy a whirl. I also invested in an Ionic Foot Detox bath and felt it helped with inflammation. I’m fairly certain you can tell, I’m not a huge proponent of our current medical system’s trend to prescribe pharmaceutical drugs.
 Tip # 10 Try Tommy Copper compression gloves, I still wear these. I have no idea if the copper, that is woven into the fabric, helps or if it’s the compression all I know is they help when I wear them in cooler weather.
Clearly, I’ve tried every natural approach I could find. Then finally, when I’d exhausted every avenue I knew of and Aleve had become a constant friend, this past summer I took the plunge. My family had patiently listened to my aches and pains, accommodated my increasing inability to open packages and jars, adjusted their diets along with mine, and watched as the condition worsened over the years. They finally encourage me to stop struggling and seek a hand specialist for help.
Tip # 11 Find a GREAT doctor! After much research I set up an appointment with a hand surgeon who has repeatedly been listed as one of Dallas’ best doctors specializing in hand issues. For me it helped that he was a professor of orthopaedic surgery at Southwestern Medical School, current on new procedures and techniques. Dr. Ellis advised that after tests were completed, I had severe carpal tunnel issues and severe osteo-arthritis in my cmc basal thumb joints. My dominant hand was addressed. He offered cortisone injections as an option for treatment but as I’ve had negative issues with cortisone injections in the past and am not a huge proponent of the side effects on internal organs, I chose to have surgery. There were two options, either to have my thumb joint fused which would stabilize the joint and allow me to lift heavy items but would not give me much range of motion, OR arthroplasty. No choice for me! I need motion with all I do.
Tip # 12 Do your research! It’s your body, your recovery. Do your research. Here are a few more sites I’ve Pinned with info that may help: http://www.pinterest.com/sewlo/arthroplasty/
The process has been a long one and the journey’s not complete but I promise there’s hope if you too suffer with this kind of pain as you can see there are many options to help along the way.
12 Steps to Recovery After Hand Surgery
Posted on November 13, 2014 13 Comments


Ready, set, go!
First let me say, I’m no expert, I share only with the hope that my experience might help someone else. I’ve simply survived. 12 weeks down and I have made it through not only one, but two surgical procedures! I had CMC basal joint arthroplasty AND carpal tunnel on my dominant hand, at the same time. If you’ve had any procedure you probably know this feeling, kind-of like when you buy a new car and suddenly everywhere you look you SEE that car. While walking around all gimped up folks tend to come out of the wood work, they see your condition and share their stories…
STEP 1. Trust the process, don’t listen to nay sayers, and only accept the good. I can’t tell you how surprised I was to hear folks eager share their negative experience after the same surgery. If you did your homework and picked a great doctor, trust the process.

Our son, Matty came over and made dinner
STEP 2. Let others do for you. Ok, this is where I’m saying do as I say, not as I do. Yep, I find it very difficult to let others do for me. I carried in too much weight in groceries and paid for it in pain. I was only supposed to pick up the weight of a coffee cup for the first 6 weeks. Our chunky chihuahua weighs a bit more than that again, I paid. Vacuuming is an compulsion for me, I did it and I paid dearly. Ok listen, LET OTHERS DO FOR YOU. Got that one, took me some painful times but I finally got it.
STEP 3. Whatever optimistic lists you made prior to surgery of things you were going to do during recovery, it’s okay just throw it out the window. It ain’t gonna happen sweetheart. Never thought all my drive would’ve left with recovery, but it did. The books I’d planned on reading while down, I couldn’t maintain a desire to get into. Oh well, let it go.

Our daughter Chels helped me embracing my goofy self on Tylenol with codone.
STEP 4. Pain medicine is there for a reason, use it! I’ve always been one to shy away from meds, meds and surgery. My family will tell you I’m the queen of vitamins and supplements but hate the need for pharmaceutical medicine and try to avoid doctors at all costs. I eat clean, whole foods and try to take care of my health. But during recovery, suck it up buttercup. Suck it up and take the meds. I’m heading into detox mode now to recover.
STEP 5. RICE. No not the starchy kind, the Rest, Ice, Compression, and Elevation kind. I found that a really large foam block was useful in elevating my hand at home and when I drove for any great distance. It was a shock absorber of sorts. Prop your hand up at night, wedged between pillows, elevate! Just do it. If you don’t trust me, you’ll pay.
STEP 6. Prayer. This really ought to be step one. Ask for prayer and accept encouragement. A physical recovery consists of spiritual support as well. To heal we have to cover all the bases, physical, emotional, and spiritual. You’re not weak, you’re just not well. You’ll recover better and more steadily with prayer support. Which leads right into…
 STEP 7. Make time for friends. The last few weeks of recovery were the best for me. Why? Because I got to spend quality time with good girlfriends, giggling. They were awesome to see my weakness and helped carry my purchases at the Houston International Quilt Festival. In fact, time with them and subsequent time with my ol schoolmate Denise in Huntsville Alabama, was distraction enough that I found I no longer needed nerve and pain meds. Healthy recovery has to consist of laughter. Yes, it is the best medicine, that and time with good friends.
STEP 8. Do your physical therapy. I found the timer on my phone helped. It was tricky at times to keep on track while on my travels but, trust me. It does pay off!
STEP 9. Go easy on you. (If you don’t blog for months, the world won’t end.) Hopefully, you’ll have folks checking in on you and still reaching out, knowing you’ll be back. Accept you’re weak and it’s for a season. You’ll be back in full form in time. Time…it really does heal all wounds.
STEP 10. Embrace mindless distraction, for me it was Pinterest. Pinterest or as my friend Kathie said the Hallmark channel on TV. Whatever’s a good healthy distraction embrace it. I thought I’d dive into Craftsy. If you read my blog you know I should have. But honestly, it’s back to that “I didn’t have the desire to do so,” or even to BE me. Weird I know, go easy on yourself it’s going to be ok.
 STEP 11 Celebrate the small stuff and be thankful. Our gratitude determines our attitude toward recovery. I found that something as simple as applying Jojoba oil with lavender and gardenia essential oil multiple times a day was awesome to help with scaring. Grateful it was a small thing with a big impact! And oh yes, elastic waistbands! They are your friend, time to embrace those cute print leggings that are so in style now but, be careful they can be the bane of your waist’s shape and existence. Be grateful, be cautious. 😉
STEP 12 Healing and health will come. It just takes time. Back to step one, trust the process.
(This post was inspired by Mrs. Jerry. Prayers for your speedy recovery love! If you reader have experienced this procedure or anything like it what did you find helped? I’d love your feedback. Thanks 🙂
Next post? Back on track, headed into creativity…
Site Down Due to Blogger’s Maintenance
Posted on August 30, 2014 Leave a Comment

Luckily, the site’s not really down, it’s just me! Been awhile since I blogged. I’ve been prepping for, and now am in recovery from, surgery on my dominant hand. Had basal joint arthroplasty and carpal tunnel surgery. In layman’s terms, I blew out my CMC thumb joint and had to have it replaced! As you may imagine, it’s been kind of tricky to type!

Happy our handsome son came by to cook a few meals for us.
I’ll be back as soon as I can. Until then, take care! 😀
Peachy Party Sangria
Posted on August 1, 2014 Leave a Comment

For foodie Friday I give you Peachy Sangria! At our house it’s a summertime party favorite. 🙂
I spent a chunk of my teen years in Germany where I attended K-Town high school. It was a military dependent’s school with the Department of Defense. While there, I met and fell in love with a bunch of other tumbleweeds, fun military brats. Sadly, we lost touch over the years for about 28 years in fact. But, this story has a happy ending, with the invent of Facebook we’ve found each other! We’ve loved the many wonderful opportunities to get together all over the US. Here’s a group shot of our last reunion in Vegas. We don’t look like brats, do we?! 😉 I have to give a shout out to my lil K-Town friend, Wendi Franzyshen Brown of New Jersey. She’s the beautiful blonde dead center in this photo. She shared a version of this sangria recipe with me. She’s also responsible for the “Creative Gypsy” photo on my blog because, she took it during one of my visits to see her.
This sangrias’s incredible, refreshing, easy to mix, and like me, feel free to adjust the recipe you desire.
Peachy Party Sangria

2 bottles of Sauvignon Blanc or Pinot Gris
1 C. peach schnapps
6 oz. frozen raspberry lemonade concentrate
2-3 C. fresh fruit, peaches, blueberries, strawberries, grapes,
Mix and let mellow for a minimum of 4 hrs. This is even better the next day! I just add a little more wine as needed to the mix. Yummy!! Let me know if you try it or if you have a favorite recipe! 😀
Kaleidoscope Star Paper Pieced Pattern
Posted on July 31, 2014 Leave a Comment
I can’t believe it’s been over a week since I was able to blog. Summer time fun, family travel, and prepping for surgery on my blown out thumb has had me busy! I have a few weeks to get ready for surgery so I’m rushing around finishing up last minute projects until I’m out of creative commission for a while. (I hear four to six months until I’m able to get even a bit of use from my right, dominant hand. “Rut Roh!” in the immortal words of Astro.)
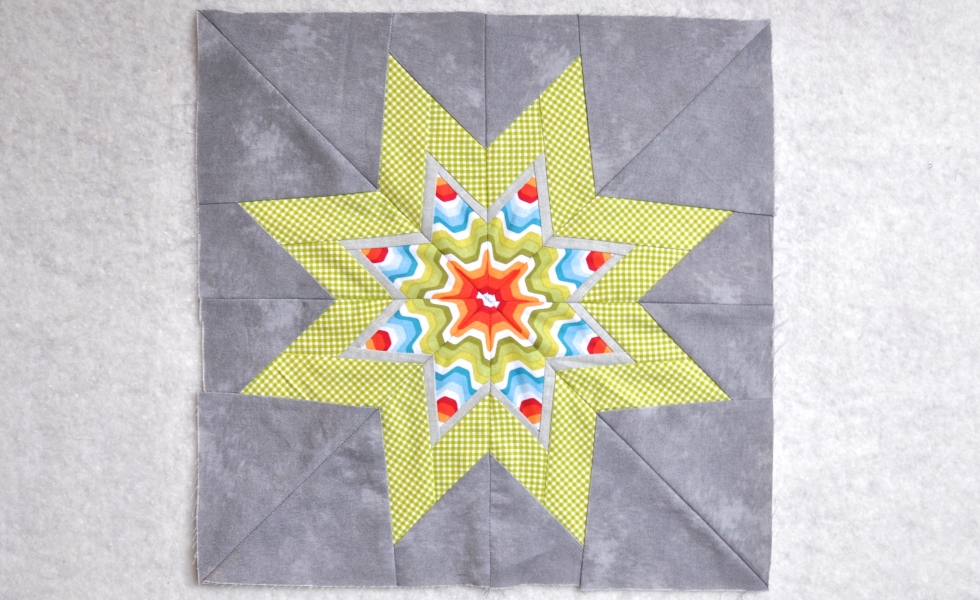
My little friend Rie over at Marie’s Creative Space is at it again! She has another paper pieced star pattern up for download on Craftsy. I was supposed to help her proof the pattern but the aforementioned busy schedule got in the way! So, when I could, I printed out her pdf and played with some fabrics in my stash.
I had fun taking my lil Feather Weight on our recent trip to see family. They live out in the country outside of Tulsa so, when I had a few minutes from time to time, I jumped on this block. 🙂

Here’s the preliminary view of the block. If you’re at all interested in learning how to paper piece, Vanessa Vargas Wilson over at The Crafty Gemini has an excellent video and for beginners. I always tease that you have to be a bit dyslexic “to get” paper piecing. Maybe it’s because, you look on one side to line up fabrics and sew on the other so, your flipping your piece back and forth as you work. All kidding aside, it’s an excellent way to get precision piecing when you quilt, here’s a link to get you going!
Marie is one of those souls, you know, the kind that everyone can’t help but love. She’s not only incredibly busy being the office manager of LaMarre Concrete, her family’s business in New Hampshire, she’s a founding board member of the NHModern Quilt Guild. She volunteers regularly with her local guild and is becoming quite the pattern designer as well! She’s constantly got something positive and creative going on. So, you can easily see our bond even tho miles away. If there were a way to bottle and sale her energy, passion, and kindness we’d all be better for getting some of it!
I hope you’ll go check her out! 😀
Free Knitting Pattern the Pixie Love Hat
Posted on July 23, 2014 Leave a Comment

This is a great fast project! I found this darling hat on Pinterest, designed by Pamela W. Allen, and published on her blog Tangled. She appropriately named it Pixie Love. Of course, I instantly dug through my stash to produce this lil cutie!
I pinned her hat and it’s never lost popularity among my fellow pinning enthusiasts. So far it’s received 304 re-pins, 28 likes, and counting! Therefore, it seemed a good pattern to share with you. If you are new to knitting, read the next paragraph. If knitting’s old hat you might be surprised to learn a new tip for joining in the round in the video below.
For you fairly new knitters, before you panic and say there’s no way I can make that! Let me give you a few video tutorials that will have you rethinking your mindset. Let me also encourage you and say if you’re new to knitting or if you’ve just want to try it, it’s not rocket science. It does help to have a decent attention span and a little time to unwind to take on knitting but I promise if you will and you’ll give yourself time, you’ll find it’s very relaxing and peaceful. If you’re a visual learner, now’s the perfect time to connect with YouTube. This little hat’s knit in the round, it makes up really fast, count your stitches, place your markers, and you should have no problem making it. After you’ve cast on the appropriate number of stitches, Nancy Wynn’s video on knitting in the round can help you with that next step. Later when you get ready to decrease here’s a video tutorial from The Knit Witch on the k2tog (knit 2 together) decrease.
Pamela’s pattern doesn’t include the darling little star but I did some research and Nanette Blanchard has the pattern available for free on her blog, knitting in color. There’s information on that on my Ravelry page about the yarn and needles I used.

I like how tidy the decreases are from this view. I enjoyed making it so much, and thought it was so sweet that I had to make another! A lil girl version for our friend’s new baby, it’s here: Nora’s baby hat. Of course, little booties were just begging to go with it. 😉

Pamela’s awfully sweet to offer the pattern for free but, she’s asking that, “I offer this pattern for free, but I do hope that if you use it (and even if you don’t), you will make a donation to save the children …thank you!” Check out her site above for more info.
